PowerShell – How to build a GUI with Visual Studio
Sometimes PowerShell scripts are a way to comlicated to present your hardly gathered data to end users that are not familiar with the command line. Therefore I recommend to present data by Windows WPF forms that could be achived without being a coding expert.
With the help of Visual Studio everyone is able to build WPF forms even without coding expertise. In this tutorial I will show you how to generate a User Information script displaying Hostname, Username and Domainname. This is a basic tutorial showing how to build a graphical user interface within minutes. The script can be extended easily, for example you can display “Model Type” of your Hardware, “Network Drives” connected, “Outlook Profile” size, installed software and a lot more!
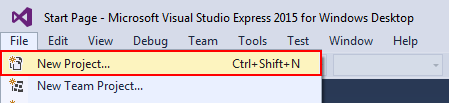
 Start a Project
Start Visual Studio (Express / Community / Professional) and open a “New Project …”
Select “WPF Appplication” and confirm with “OK“.
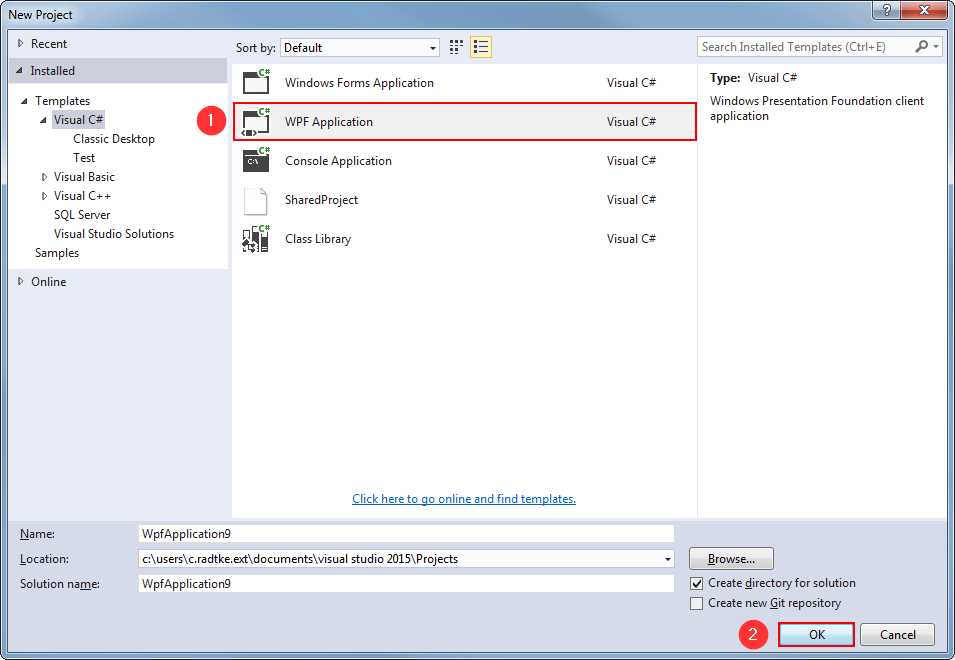
Result:
The result is an empty WPF form that will be extended within the next steps.

 Add Labels, Textboxes and Close Button
Add four labels to your form as in the picture below. If the Toolbox on the left side isn’t available on your Visual Studio installation you could reopen this element by clicking “View –> Toolbox“.
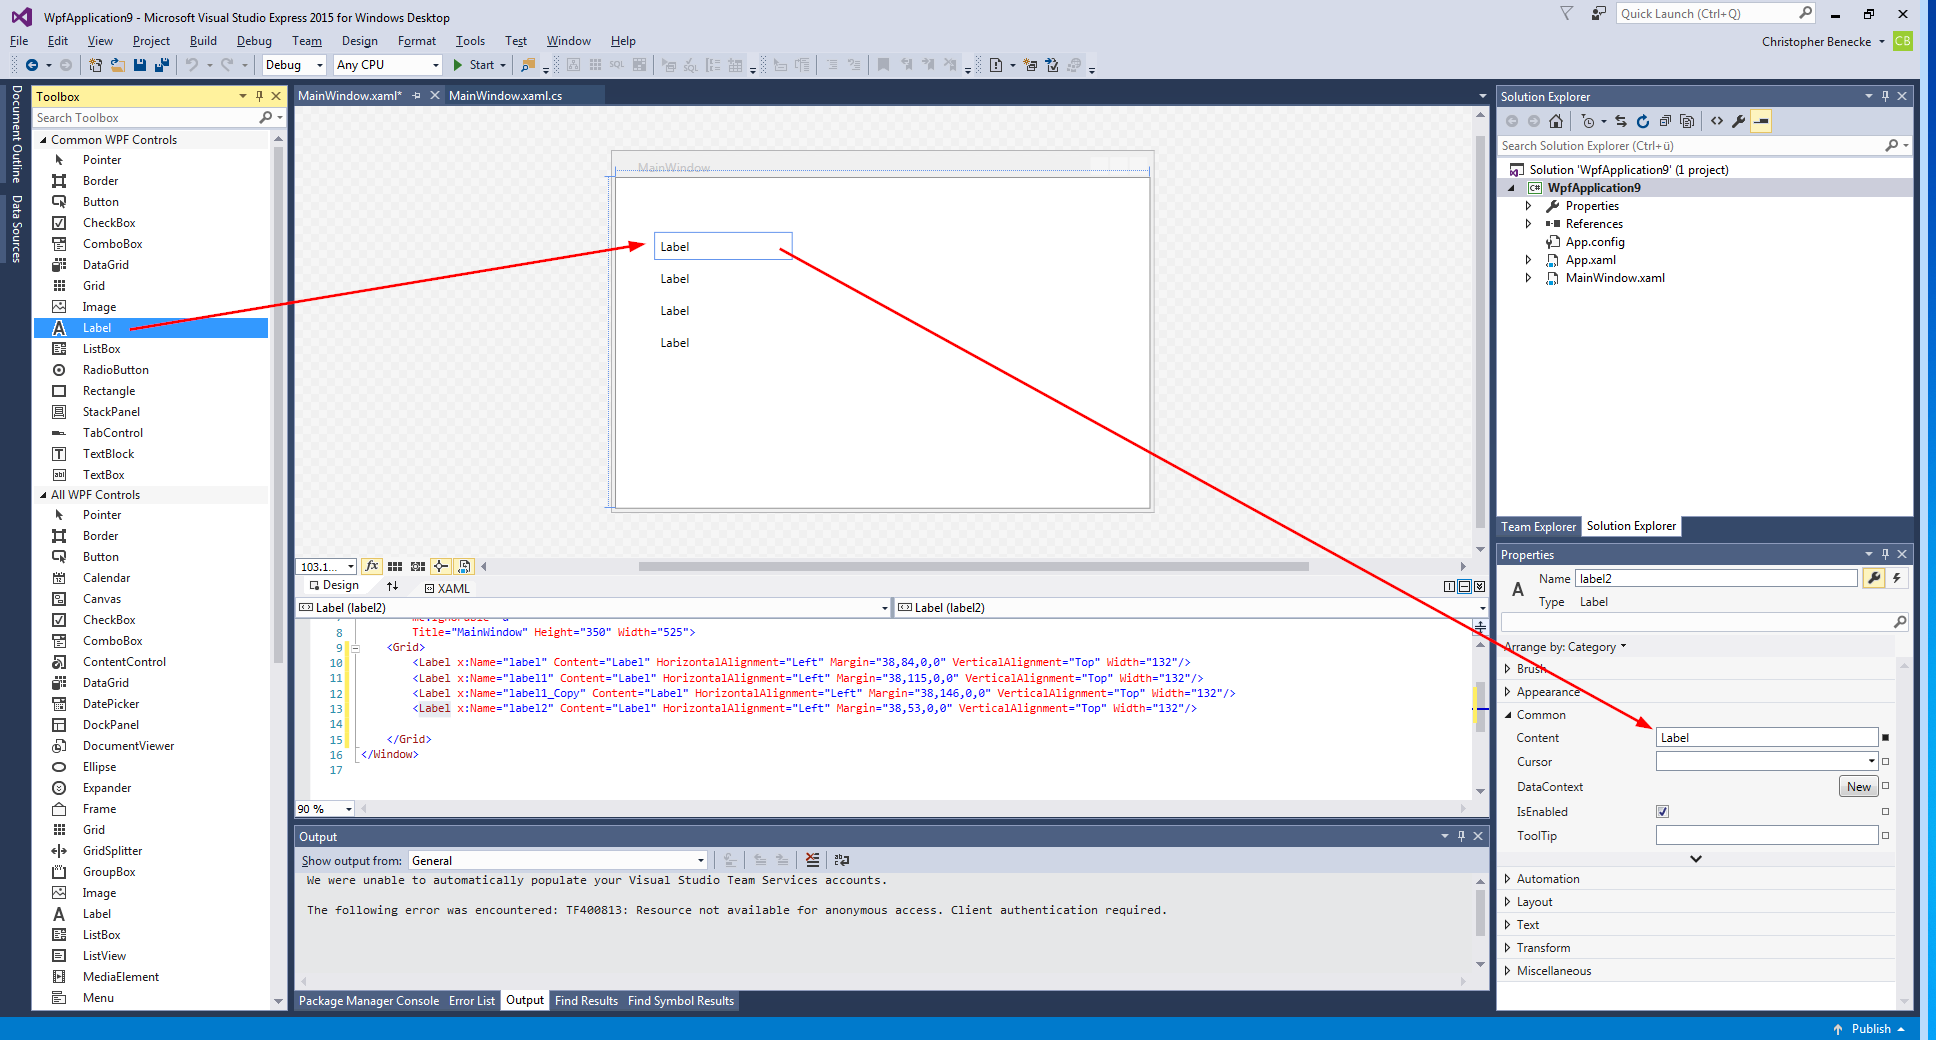
Add three textboxes to your form.
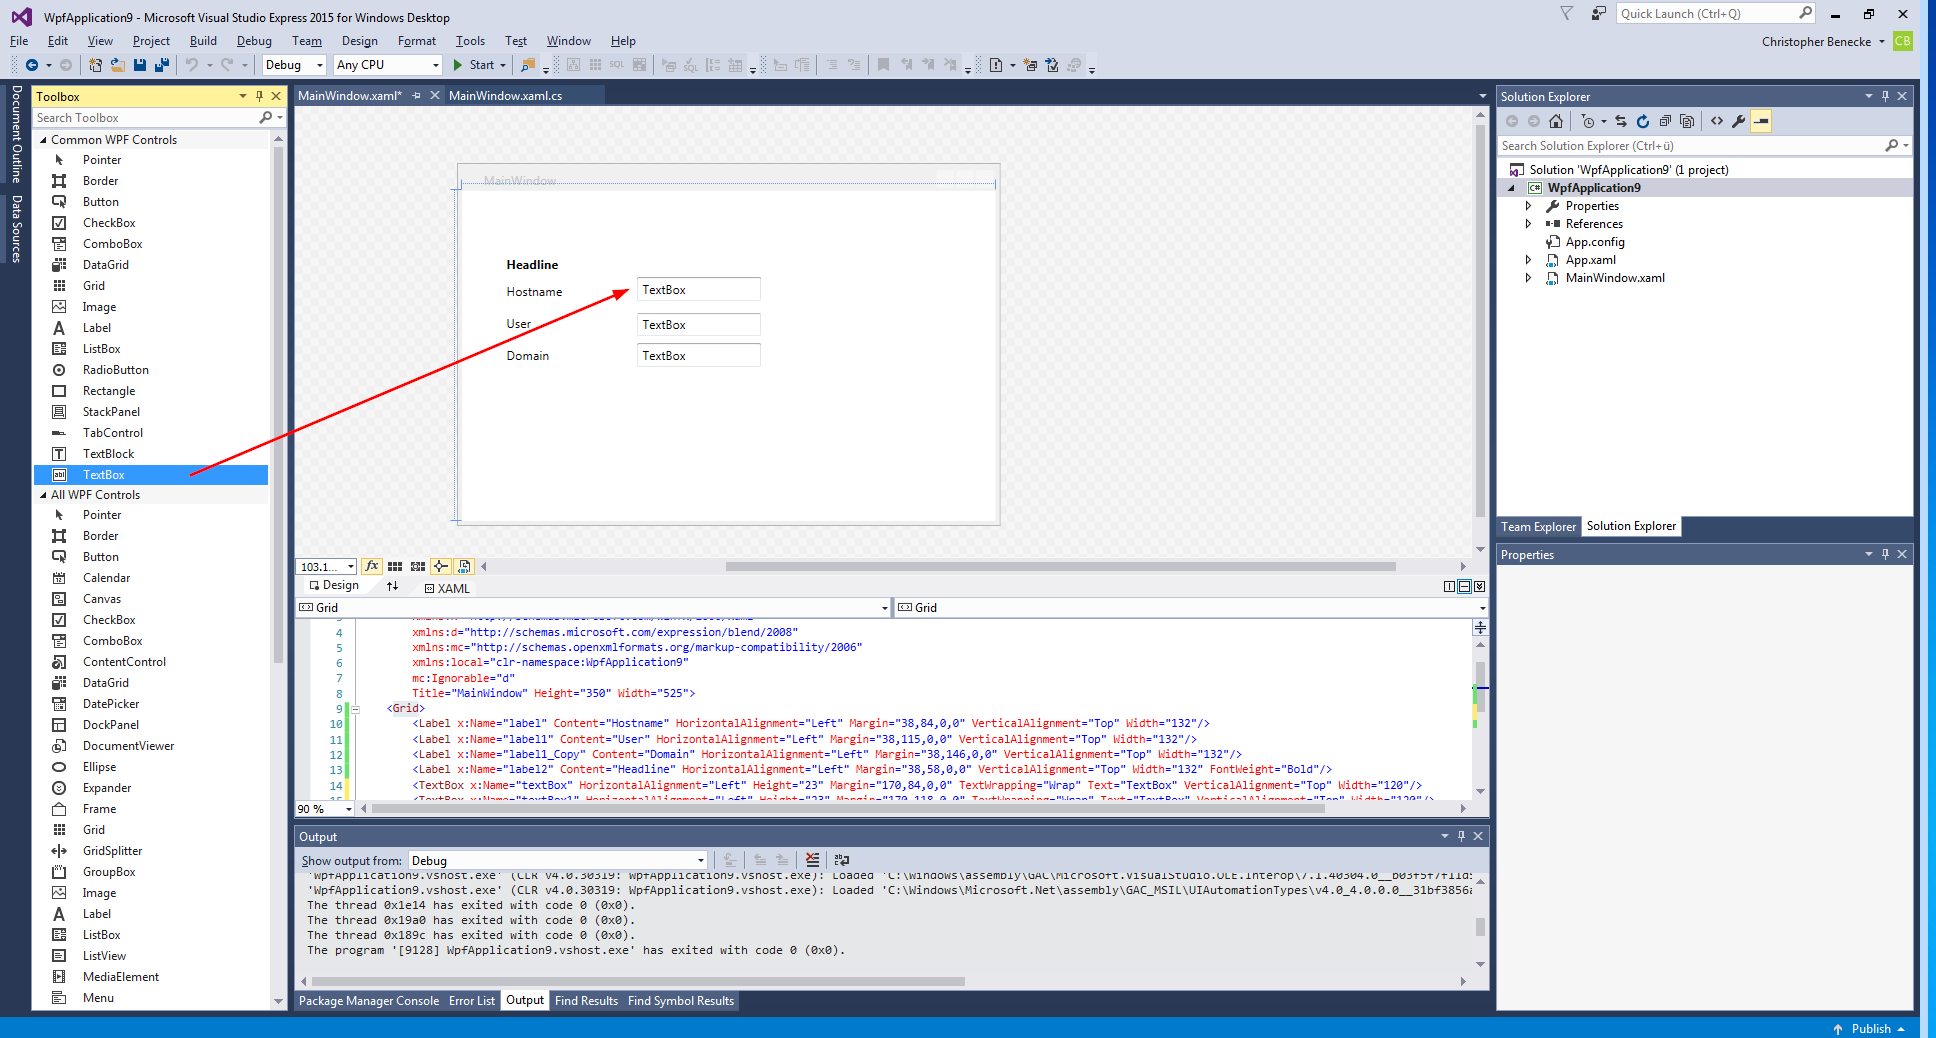
Add a close button to your form.
Result:
Visual Studio will automatically generate the following XAML code that can be used in PowerShell.
<Window x:Class="WpfApplication9.MainWindow"
        xmlns="http://schemas.microsoft.com/winfx/2006/xaml/presentation"
        xmlns:x="http://schemas.microsoft.com/winfx/2006/xaml"
        xmlns:d="http://schemas.microsoft.com/expression/blend/2008"
        xmlns:mc="http://schemas.openxmlformats.org/markup-compatibility/2006"
        xmlns:local="clr-namespace:WpfApplication9"
        mc:Ignorable="d"
        Title="MainWindow" Height="350" Width="525">
    <Grid>
        <Label x:Name="label" Content="Hostname" HorizontalAlignment="Left" Margin="38,84,0,0" VerticalAlignment="Top" Width="132"/>
        <Label x:Name="label1" Content="User" HorizontalAlignment="Left" Margin="38,115,0,0" VerticalAlignment="Top" Width="132"/>
        <Label x:Name="label1_Copy" Content="Domain" HorizontalAlignment="Left" Margin="38,146,0,0" VerticalAlignment="Top" Width="132"/>
        <Label x:Name="label2" Content="Headline" HorizontalAlignment="Left" Margin="38,51,0,0" VerticalAlignment="Top" Width="132" FontWeight="Bold"/>
        <TextBox x:Name="textBox" HorizontalAlignment="Left" Height="23" Margin="170,87,0,0" TextWrapping="Wrap" Text="TextBox" VerticalAlignment="Top" Width="120"/>
        <TextBox x:Name="textBox1" HorizontalAlignment="Left" Height="23" Margin="170,118,0,0" TextWrapping="Wrap" Text="TextBox" VerticalAlignment="Top" Width="120"/>
        <TextBox x:Name="textBox2" HorizontalAlignment="Left" Height="23" Margin="170,148,0,0" TextWrapping="Wrap" Text="TextBox" VerticalAlignment="Top" Width="120"/>
        <Button x:Name="button" Content="Close" HorizontalAlignment="Left" Margin="38,197,0,0" VerticalAlignment="Top" Width="75"/>
    </Grid>
</Window>
To generate a WPF in PowerShell we can use the following script as a good start.
[void][System.Reflection.Assembly]::LoadWithPartialName('presentationframework')
[xml]$XAML = @"

<-- PASTE VISUAL STUDIO XML CODE HERE -->

"@
#Read XAML
$reader=(New-Object System.Xml.XmlNodeReader $xaml)
try{$Form=[Windows.Markup.XamlReader]::Load( $reader )}
catch{Write-Host "Unable to load Windows.Markup.XamlReader"; exit}

# Store Form Objects In PowerShell
$xaml.SelectNodes("//*[@Name]") | ForEach-Object {Set-Variable -Name ($_.Name) -Value $Form.FindName($_.Name)}

#Show Form
$Form.ShowDialog() | out-null
Before we can paste our Visual Studio XAML code into the PowerShell script we have to perform some small modifications:
- Change line 1 from <Window x:Class=”WpfApplication9.MainWindow” to <Window
- Remove line 6 and 7
- Line 10 to 17 – Rename x:Name= to Name=
After modification just paste the XAML code to your PowerShell script in line 4.
Result:
[void][System.Reflection.Assembly]::LoadWithPartialName('presentationframework')
[xml]$XAML = @"

<Window
        xmlns="http://schemas.microsoft.com/winfx/2006/xaml/presentation"
        xmlns:x="http://schemas.microsoft.com/winfx/2006/xaml"
        xmlns:d="http://schemas.microsoft.com/expression/blend/2008"
        xmlns:mc="http://schemas.openxmlformats.org/markup-compatibility/2006"


        Title="MainWindow" Height="350" Width="525">
    <Grid>
        <Label Name="label" Content="Hostname" HorizontalAlignment="Left" Margin="38,84,0,0" VerticalAlignment="Top" Width="132"/>
        <Label Name="label1" Content="User" HorizontalAlignment="Left" Margin="38,115,0,0" VerticalAlignment="Top" Width="132"/>
        <Label Name="label1_Copy" Content="Domain" HorizontalAlignment="Left" Margin="38,146,0,0" VerticalAlignment="Top" Width="132"/>
        <Label Name="label2" Content="Headline" HorizontalAlignment="Left" Margin="38,51,0,0" VerticalAlignment="Top" Width="132" FontWeight="Bold"/>
        <TextBox Name="textBox" HorizontalAlignment="Left" Height="23" Margin="170,87,0,0" TextWrapping="Wrap" Text="TextBox" VerticalAlignment="Top" Width="120"/>
        <TextBox Name="textBox1" HorizontalAlignment="Left" Height="23" Margin="170,118,0,0" TextWrapping="Wrap" Text="TextBox" VerticalAlignment="Top" Width="120"/>
        <TextBox Name="textBox2" HorizontalAlignment="Left" Height="23" Margin="170,148,0,0" TextWrapping="Wrap" Text="TextBox" VerticalAlignment="Top" Width="120"/>
        <Button Name="button" Content="Close" HorizontalAlignment="Left" Margin="38,197,0,0" VerticalAlignment="Top" Width="75"/>
    </Grid>
</Window>


"@
#Read XAML
$reader=(New-Object System.Xml.XmlNodeReader $xaml)
try{$Form=[Windows.Markup.XamlReader]::Load( $reader )}
catch{Write-Host "Unable to load Windows.Markup.XamlReader"; exit}

# Store Form Objects In PowerShell
$xaml.SelectNodes("//*[@Name]") | ForEach-Object {Set-Variable -Name ($_.Name) -Value $Form.FindName($_.Name)}

#Show Form
$Form.ShowDialog() | out-null
Save your PowerShell script and execute it. If you used PowerShell ISE to built your script just press F5 and you will see the following result.
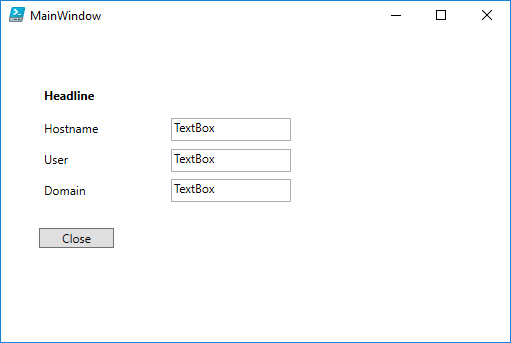
 Congratulations you built your own PowerShell GUI!
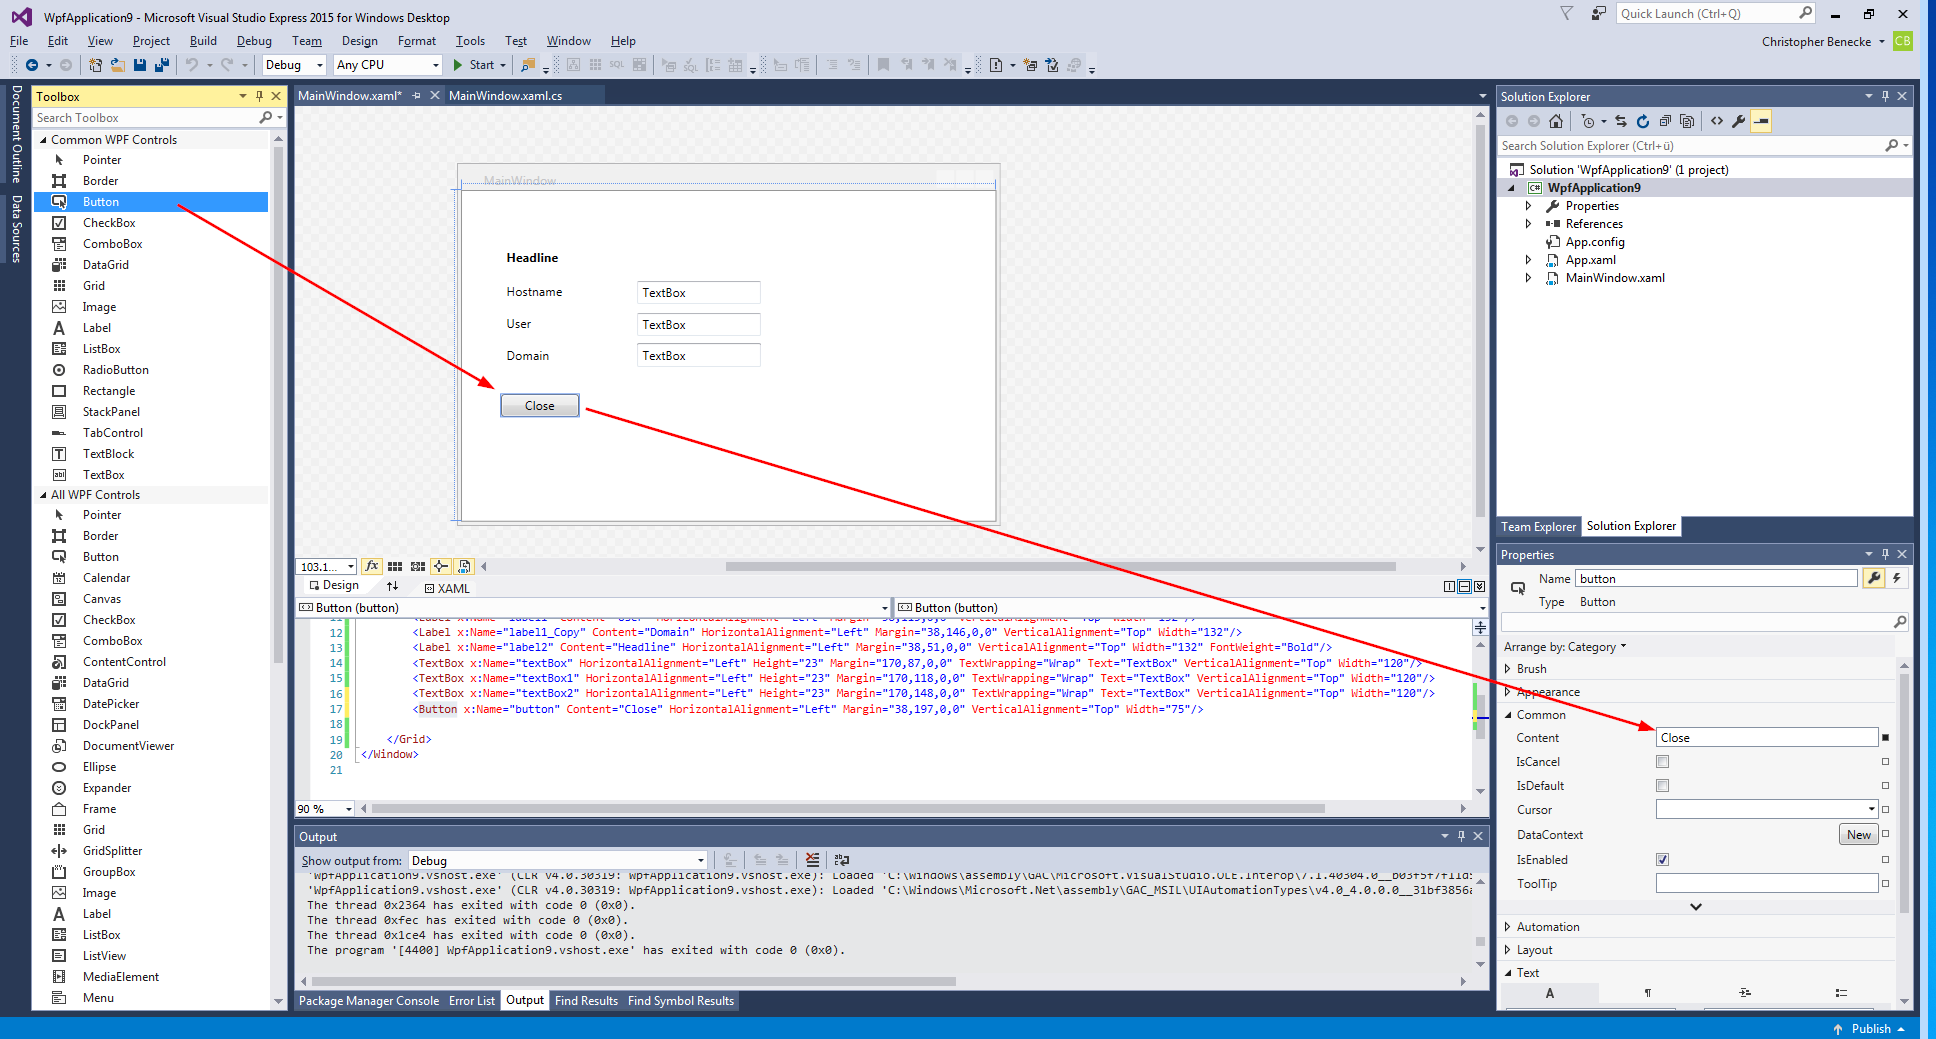
Add Close Event
Now that we are able to display our form we should get the close button running first. We just have to assign a event to our button that is named “button” by default.
[void][System.Reflection.Assembly]::LoadWithPartialName('presentationframework')
[xml]$XAML = @"

<Window
        xmlns="http://schemas.microsoft.com/winfx/2006/xaml/presentation"
        xmlns:x="http://schemas.microsoft.com/winfx/2006/xaml"
        xmlns:d="http://schemas.microsoft.com/expression/blend/2008"
        xmlns:mc="http://schemas.openxmlformats.org/markup-compatibility/2006"


        Title="MainWindow" Height="350" Width="525">
    <Grid>
        <Label Name="label" Content="Hostname" HorizontalAlignment="Left" Margin="38,84,0,0" VerticalAlignment="Top" Width="132"/>
        <Label Name="label1" Content="User" HorizontalAlignment="Left" Margin="38,115,0,0" VerticalAlignment="Top" Width="132"/>
        <Label Name="label1_Copy" Content="Domain" HorizontalAlignment="Left" Margin="38,146,0,0" VerticalAlignment="Top" Width="132"/>
        <Label Name="label2" Content="Headline" HorizontalAlignment="Left" Margin="38,51,0,0" VerticalAlignment="Top" Width="132" FontWeight="Bold"/>
        <TextBox Name="textBox" HorizontalAlignment="Left" Height="23" Margin="170,87,0,0" TextWrapping="Wrap" Text="TextBox" VerticalAlignment="Top" Width="120"/>
        <TextBox Name="textBox1" HorizontalAlignment="Left" Height="23" Margin="170,118,0,0" TextWrapping="Wrap" Text="TextBox" VerticalAlignment="Top" Width="120"/>
        <TextBox Name="textBox2" HorizontalAlignment="Left" Height="23" Margin="170,148,0,0" TextWrapping="Wrap" Text="TextBox" VerticalAlignment="Top" Width="120"/>
        <Button Name="button" Content="Close" HorizontalAlignment="Left" Margin="38,197,0,0" VerticalAlignment="Top" Width="75"/>
    </Grid>
</Window>


"@
#Read XAML
$reader=(New-Object System.Xml.XmlNodeReader $xaml)
try{$Form=[Windows.Markup.XamlReader]::Load( $reader )}
catch{Write-Host "Unable to load Windows.Markup.XamlReader"; exit}

# Store Form Objects In PowerShell
$xaml.SelectNodes("//*[@Name]") | ForEach-Object {Set-Variable -Name ($_.Name) -Value $Form.FindName($_.Name)}

#Assign event
$button.Add_Click({
    $form.Close()
})

#Show Form
$Form.ShowDialog() | out-null
You are now able to close you application by clicking

Add System Variables
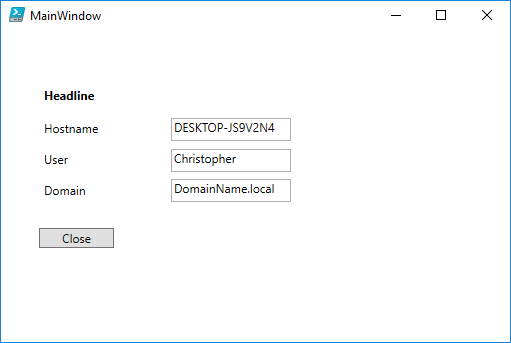
To receive the Hostname, Username and the Domain we can use the following commands:
Write-Output $env:COMPUTERNAME
Write-Output $env:USERNAME
Write-Output $env:USERDOMAIN
Just add the following marked lines to your code and you are done with your first PowerShell WPF Form.
[void][System.Reflection.Assembly]::LoadWithPartialName('presentationframework')
[xml]$XAML = @"
<Window
        xmlns="http://schemas.microsoft.com/winfx/2006/xaml/presentation"
        xmlns:x="http://schemas.microsoft.com/winfx/2006/xaml"
        xmlns:d="http://schemas.microsoft.com/expression/blend/2008"
        xmlns:mc="http://schemas.openxmlformats.org/markup-compatibility/2006"
        Title="MainWindow" Height="350" Width="525">
    <Grid>
        <Label Name="label" Content="Hostname" HorizontalAlignment="Left" Margin="38,84,0,0" VerticalAlignment="Top" Width="132"/>
        <Label Name="label1" Content="User" HorizontalAlignment="Left" Margin="38,115,0,0" VerticalAlignment="Top" Width="132"/>
        <Label Name="label1_Copy" Content="Domain" HorizontalAlignment="Left" Margin="38,146,0,0" VerticalAlignment="Top" Width="132"/>
        <Label Name="label2" Content="Headline" HorizontalAlignment="Left" Margin="38,51,0,0" VerticalAlignment="Top" Width="132" FontWeight="Bold"/>
        <TextBox Name="textBox" HorizontalAlignment="Left" Height="23" Margin="170,87,0,0" TextWrapping="Wrap" Text="TextBox" VerticalAlignment="Top" Width="120"/>
        <TextBox Name="textBox1" HorizontalAlignment="Left" Height="23" Margin="170,118,0,0" TextWrapping="Wrap" Text="TextBox" VerticalAlignment="Top" Width="120"/>
        <TextBox Name="textBox2" HorizontalAlignment="Left" Height="23" Margin="170,148,0,0" TextWrapping="Wrap" Text="TextBox" VerticalAlignment="Top" Width="120"/>
        <Button Name="button" Content="Close" HorizontalAlignment="Left" Margin="38,197,0,0" VerticalAlignment="Top" Width="75"/>
    </Grid>
</Window>
"@
#Read XAML
$reader=(New-Object System.Xml.XmlNodeReader $xaml)
try{$Form=[Windows.Markup.XamlReader]::Load( $reader )}
catch{Write-Host "Unable to load Windows.Markup.XamlReader"; exit}

# Store Form Objects In PowerShell
$xaml.SelectNodes("//*[@Name]") | ForEach-Object {Set-Variable -Name ($_.Name) -Value $Form.FindName($_.Name)}

#Assign system variables
$textBox.text = $env:COMPUTERNAME
$textBox1.text = $env:USERNAME
$textBox2.text = $env:USERDOMAIN

#Assign event
$button.Add_Click({
    $form.Close()
})

#Show Form
$Form.ShowDialog() | out-null
Result:
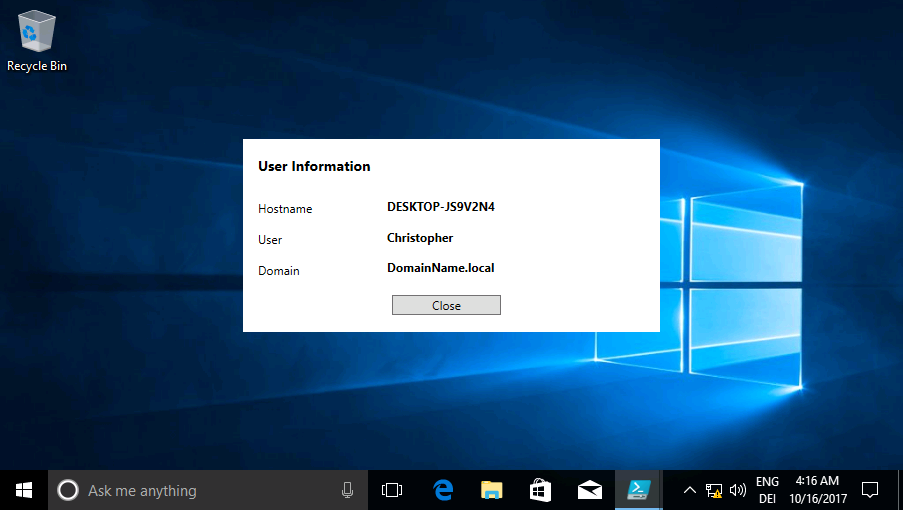
Feel free to modify your XAML code in Visual Studio to get better user experiences. As an example I’ve created the following XAML code.
[void][System.Reflection.Assembly]::LoadWithPartialName('presentationframework')
[xml]$XAML = @"
<Window
        xmlns="http://schemas.microsoft.com/winfx/2006/xaml/presentation"
        xmlns:x="http://schemas.microsoft.com/winfx/2006/xaml"
        xmlns:d="http://schemas.microsoft.com/expression/blend/2008"
        xmlns:mc="http://schemas.openxmlformats.org/markup-compatibility/2006"
        Title="MainWindow" Height="192.937" Width="417.383" ResizeMode="NoResize" WindowStartupLocation="CenterScreen" WindowStyle="None" Background="White">
    <Grid HorizontalAlignment="Left" Width="407" Height="187" VerticalAlignment="Top">
        <Label Name="label" Content="Hostname" HorizontalAlignment="Left" Margin="10,56,0,0" VerticalAlignment="Top" Width="132"/>
        <Label Name="label1" Content="User" HorizontalAlignment="Left" Margin="10,87,0,0" VerticalAlignment="Top" Width="132"/>
        <Label Name="label1_Copy" Content="Domain" HorizontalAlignment="Left" Margin="10,118,0,0" VerticalAlignment="Top" Width="132"/>
        <Label Name="label2" Content="User Information" HorizontalAlignment="Left" Margin="10,12,0,0" VerticalAlignment="Top" Width="387" FontSize="14" FontWeight="Bold"/>
        <TextBox Name="textBox" HorizontalAlignment="Left" Height="23" Margin="142,59,0,0" TextWrapping="Wrap" Text="TextBox" VerticalAlignment="Top" Width="252" BorderThickness="0" FontWeight="Bold"/>
        <TextBox Name="textBox1" HorizontalAlignment="Left" Height="23" Margin="142,90,0,0" TextWrapping="Wrap" Text="TextBox" VerticalAlignment="Top" Width="252" BorderThickness="0" FontWeight="Bold"/>
        <TextBox Name="textBox2" HorizontalAlignment="Left" Height="23" Margin="142,120,0,0" TextWrapping="Wrap" Text="TextBox" VerticalAlignment="Top" Width="252" BorderThickness="0" FontWeight="Bold"/>
        <Button Name="button" Content="Close" Margin="149,156,149,0" VerticalAlignment="Top"/>
    </Grid>
</Window>
"@
#Read XAML
$reader=(New-Object System.Xml.XmlNodeReader $xaml)
try{$Form=[Windows.Markup.XamlReader]::Load( $reader )}
catch{Write-Host "Unable to load Windows.Markup.XamlReader"; exit}

# Store Form Objects In PowerShell
$xaml.SelectNodes("//*[@Name]") | ForEach-Object {Set-Variable -Name ($_.Name) -Value $Form.FindName($_.Name)}

#Assign system variables
$textBox.text = $env:COMPUTERNAME
$textBox1.text = $env:USERNAME
$textBox2.text = $env:USERDOMAIN

#Assign event
$button.Add_Click({
    $form.Close()
})

#Show Form
$Form.ShowDialog() | out-null
As you can see the result looks different to the form before and it just took a few minutes to achive this result in Visual Studio.